Key Takeaways
- Match shoulder or upper-body support to the inspection movements and duration, rather than choosing by product type alone.
- Assess fatigue and ergonomic demands across the full task, including how posture and effort change over a shift.
- Test movement with the actual tools and required PPE to identify interference before committing to a purchase.
- Build a payback estimate around expected use and operational effects, not a headline return that may not fit your workplace.
- Use a vendor-neutral comparison and a workplace trial to assess which option best fits the task.
Table of Contents
- Technician injury risk and fatigue
- Choosing an exoskeleton for the task
- Exoskeleton compatibility with tools and PPE
- Exoskeleton purchase costs and payback
- What are the risks and limitations of wearing an exoskeleton during overhead work?
- Ryggo
Technician injury risk and fatigue
Overhead inspections can require technicians to keep their arms raised while examining ceiling-mounted cable trays, pipework or equipment. Holding that position can load the shoulder and arm muscles, especially when the task also involves looking upwards or handling a tool. Exposure depends on posture, repetition and time spent working overhead, so assess the inspection sequence itself rather than relying on the job title.
An exoskeleton supports the worker’s muscles and joints; it doesn’t perform the inspection. For sustained raised-arm work, shoulder or upper-body support may help reduce muscular effort, but its effect needs to be assessed on the job. Support that feels useful during one movement may feel restrictive during a close visual check, a cross-body reach or a change of position.

Inspection example: A technician checks overhead joints while holding a torch. Action: Observe the full sequence, including reaching, looking, handling the torch and lowering the arms. Result: The assessment shows where shoulder effort builds up and whether support helps without obstructing the view or task. Record worker feedback alongside task observations instead of relying on a first impression.
Fatigue can also change how a task feels over time. Compare the same inspection movements at the start and later in the work period. Note whether the technician raises their shoulders, changes stance, pauses more often or struggles to hold a tool steadily. These observations help distinguish a need for support from other factors, such as awkward access or a difficult-to-hold tool.
Breaks, heat and fatigue deserve attention during any trial. An exoskeleton adds material and weight to the body, which may affect comfort and heat build-up. Keep the workplace’s normal breaks in place. Ask workers to report discomfort, excessive warmth or restricted movement, and observe whether these issues arise during a repeated inspection cycle. A device should never be a reason to extend work without rest.
Use a structured comparison: document the task, observe movements without support, then repeat them with the device under comparable conditions. Include different inspection actions, such as looking upwards, reaching across a panel and using a handheld tool. Ask workers to describe comfort and fatigue in their own words. Record which movements feel easier, which remain demanding, and whether the device creates pressure or extra effort elsewhere.
Exoskeletons can support ergonomic improvements, but they don’t remove the need to address the task itself. If awkward access leads to prolonged reaching, improve access where practical. Treat any reduction in muscle load as something to establish through workplace testing, not an assumed outcome.
Choosing an exoskeleton for the task
Start with the movements the inspection requires, not a broad label such as “overhead work”. A ceiling inspection may involve holding a torch, reaching across a panel and looking upwards. Cable-tray checks may require longer reaches or repeated tool use. An exoskeleton for overhead inspection tasks should suit these movements, not just the general job category.
Compare candidate designs by their stated weight, adjustment options and supported body area. These features affect fit and movement, but specifications alone can’t show how a device feels during a real inspection. An exoskeleton for overhead inspection tasks must be assessed by the worker doing the job, with the usual tools and PPE.
An exoskeleton doesn’t replace the safety procedures and PPE requirements applicable to the task. For European selection, use DGUV 208-062 as the relevant selection guidance.
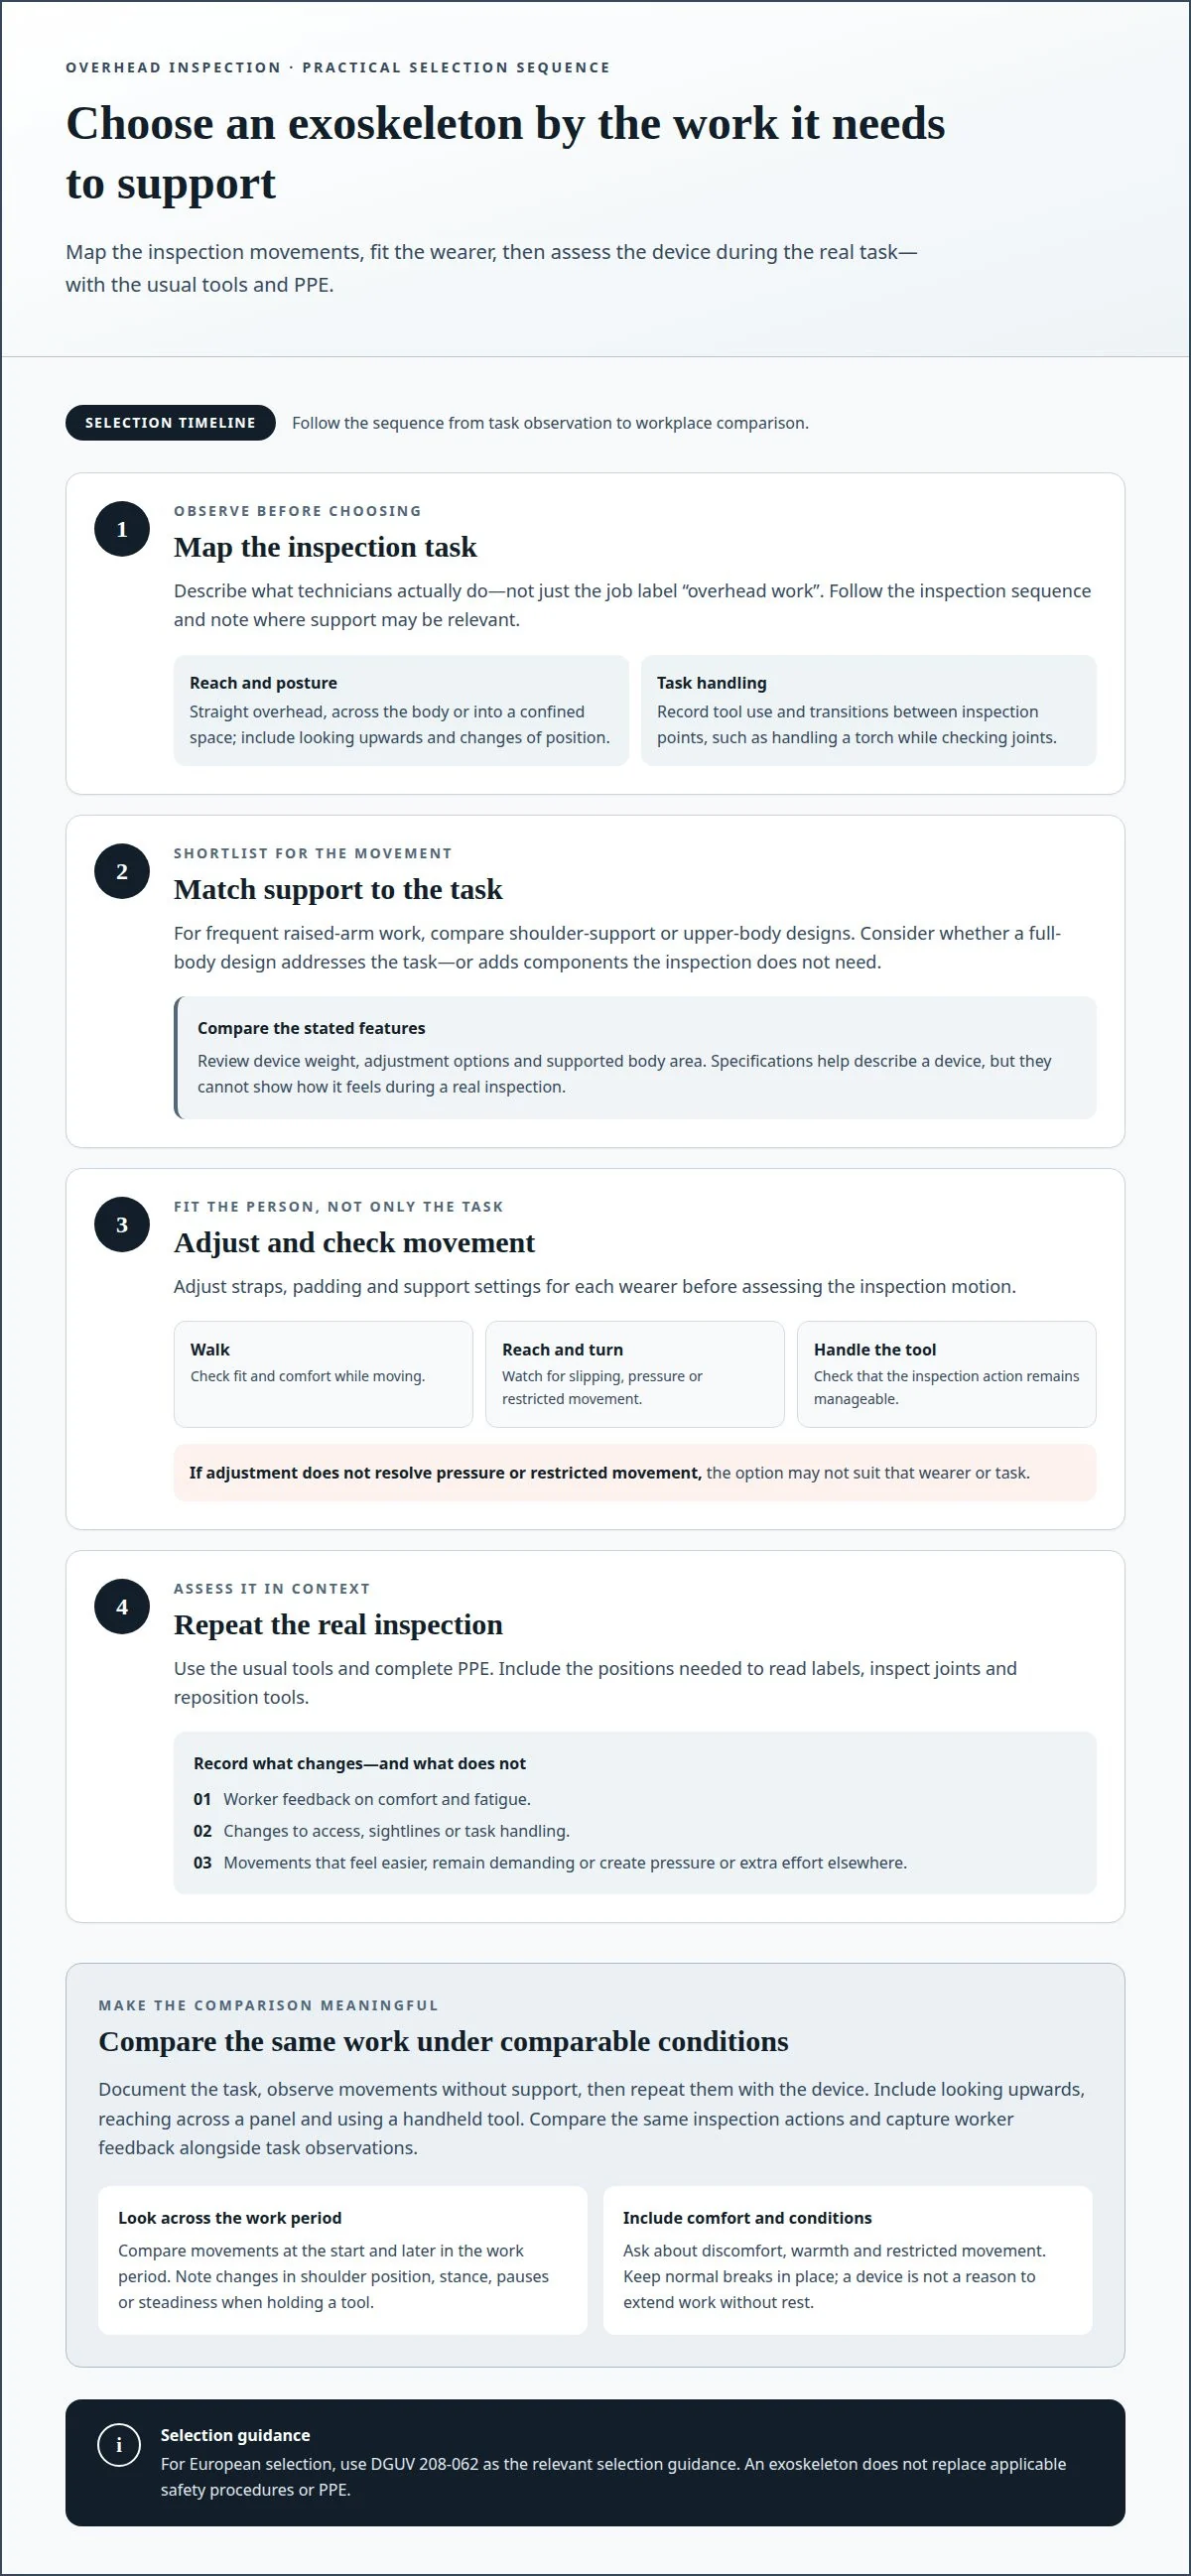
Assess the work before fitting workers. Observe the inspection sequence, identify positions where support may help, then let each wearer adjust the device before trying the task. Check comfort, range of motion and pressure points as the worker reaches, turns and handles the inspection tool.
A practical selection process can follow these steps:
- Map the task. Record whether the technician reaches straight overhead, across the body or into a confined space. Include tool handling and transitions between inspection points.
- Match support to movement. For frequent raised-arm work, compare upper-body or shoulder-support designs. Consider whether a full-body design addresses the task or adds components the inspection doesn’t need.
- Fit each wearer. Adjust straps, padding and support settings to the individual. Ask the worker to walk, reach and perform the inspection motion; watch for slipping, pressure or restricted movement.
- Repeat the real task. Trial the device with the usual tools and PPE, including positions used to read labels or inspect joints. Record worker feedback and any change in access or task handling.
Example: A technician inspects a ceiling-mounted cable tray with a handheld torch. The employer compares shoulder-support options, adjusts the fit, then observes the technician reaching, viewing connections and repositioning the torch. This provides a task-based comparison of support, sightlines and controlled tool use.
Don’t approve a device based on a brief standing fit alone. Check the adjustment range and freedom of movement throughout the inspection sequence. If adjustments don’t resolve pressure or restricted movement, the option may not suit that wearer or task. Record why each device is rejected or shortlisted, so procurement decisions reflect practical fit rather than an initial impression.
Exoskeleton compatibility with tools and PPE
Compatibility is part of task fit, not a final procurement detail. During an overhead inspection, a technician may wear a hard hat, eye protection, gloves and hearing protection while using a torch or handheld meter. Include any harness or other equipment required for the job. Assess the exoskeleton with the complete setup, since testing it over ordinary clothing won’t reveal every potential point of interference.
Start with the actual inspection sequence. Have the wearer put on the exoskeleton and all required PPE, then perform representative actions: look upwards, reach to a connection, turn the torso and handle each tool. Observe whether straps shift, joints restrict movement or support components press against PPE. Record issues against the specific action, rather than simply labelling them “uncomfortable”.
Check tool interaction as carefully as fit. A shoulder-support device could change how a worker raises an arm to position a torch or meter. Confirm that the worker can grip, aim and reposition each tool without compensating with an awkward wrist or torso posture. If the inspection uses a tool tether, include it in the trial and check whether it catches on straps or support elements.
Example, torch inspection: A technician checks a ceiling joint while wearing eye protection and holding a torch. The employer observes the worker’s sightline and arm position with the exoskeleton fitted. If a strap crosses the viewing area or limits reach, adjust the fit and repeat the movement. The setup should allow clear visibility and controlled handling throughout the inspection.
Example, harness use: A task requires a harness alongside the exoskeleton. Fit both items as they would be worn at work, then check the connection points and the worker’s movement. Don’t assume one item can sit over the other safely or comfortably. If the combination shifts equipment or restricts access, stop that configuration and assess another fit or device.
- PPE: Confirm the hard hat, eye protection, gloves and other task-required items remain correctly worn during reaching and turning.
- Tools: Check grip, aiming, tool changes and access to controls while the worker holds the arms overhead.
- Movement: Observe reaching, looking upwards, turning and moving between inspection points.
- Contact points: Note pressure, rubbing or strap movement where the device meets clothing or PPE.
Record the combination tested, the inspection action and the worker’s feedback. Repeat the same sequence after any adjustment; otherwise, it’s unclear whether the change resolved the interference. A suitable setup must support the task without compromising required PPE use, tool control or freedom of movement. If the wearer changes tools or protective equipment, reassess the configuration before treating the earlier trial as representative.
Ready to find the right device for your operation?
Exoskeleton purchase costs and payback
Purchase price is only one part of the investment. For overhead inspection, include the device, worker onboarding, any required accessories and the time needed to integrate it into the task. Compare the total with expected use, rather than with a broad estimate from another industry or work pattern.
A trial before purchase lets a team assess fit and task compatibility in its own inspection workflow; rental availability depends on the channel and arrangement.
Build the payback case from operational data. First define the task and how many workers would use the device. Then estimate how often they perform it and identify measurable outcomes that matter, such as time on task, interruptions, worker-reported fatigue or changes in work allocation. Use existing records where available, and distinguish observed results from assumptions.
A simple calculation is: payback period = total investment ÷ net benefit per period. Net benefit should reflect the value of measured operational changes, less any recurring costs included in the business case. Keep the period consistent, such as monthly benefit against total investment, and state each assumption separately. If the operation can’t identify a credible benefit, the calculation won’t provide a reliable basis for a purchasing decision.
Example, frequent inspections: A team considers a shoulder-support device for a repeated ceiling inspection. The finance lead records purchase and implementation costs; the operations lead measures current task time and interruptions. The team tests the device, then compares like-for-like observations. If the test shows no meaningful operational benefit, the business case shouldn’t assume one. If it identifies a benefit, use that measured value in the calculation.
Keep ergonomics and financial return distinct. Reduced perceived effort may matter to workers, but it doesn’t automatically create a cash saving. Record worker feedback alongside operational measures, and don’t treat a possible reduction in strain as a guaranteed financial return.
- Set the scope: specify the inspection task, users and expected frequency.
- Track costs: include the device and implementation inputs relevant to the operation.
- Measure the baseline: record current task time, interruptions and worker feedback.
- Compare after a trial: repeat the same task conditions and use observed changes.
Before relying on projected payback, test the device with the actual inspection actions, tools and PPE. A workplace trial can reveal fit or workflow issues that a specification sheet can’t. Keep the final calculation transparent: show what was measured, what was estimated and which result could change the decision.
What are the risks and limitations of wearing an exoskeleton during overhead work?
An exoskeleton can support overhead work, but it also changes how a worker moves. Poor fit may restrict reaching or make lifting and turning less controlled. Treat fit as task-specific, not as a one-time clothing adjustment. If straps slip or pressure builds during an inspection, stop and adjust before continuing.
Example, restricted reach: A technician checks a ceiling connection while wearing shoulder support. The device shifts during a cross-body reach. The supervisor pauses the task, refits the straps and repeats the movement. If the device still shifts, that worker-device combination is unsuitable for the task. Don’t ask the worker to compensate by twisting or reaching farther.
Required PPE remains necessary when wearing an exoskeleton. Test the complete arrangement, including the worker’s hard hat, eye protection, gloves and any harness required for the task. Check that the exoskeleton doesn’t interfere with PPE positioning, tool handling or access to inspection points. If equipment moves out of place during a reach, stop and reassess the setup.
Example, harness interaction: A worker needs a harness for an overhead inspection. The team fits the harness and exoskeleton together, then observes reaching and turning. If straps overlap or movement is restricted, adjust the combination before work continues. A successful static fit alone doesn’t show whether both items remain correctly positioned during the task.
Dirt, sweat and debris can affect an exoskeleton and contribute to breakdowns. Before each shift, inspect for damaged parts, loose straps and visible wear. If a worker finds damage, report it and keep the device out of use until it has been addressed according to the manufacturer’s instructions. Clean and maintain the equipment as directed by its manufacturer.
Heat and added weight also matter during repeated overhead work. Keep regular breaks in the work pattern, and ask workers to report unusual warmth, discomfort or fatigue. A device that feels acceptable at the start may become uncomfortable during a longer inspection sequence. Don’t use perceived support as a reason to extend work without rest.
Introduce the equipment before assigning it to a live inspection. Show workers how to put it on, adjust it and use it safely, then practise with the tools and PPE used on the job. Observe the full sequence, including transitions between inspection points. Record discomfort, movement limits and equipment interference, and address those findings before wider use.
These checks help identify limitations, but they don’t eliminate risk. An exoskeleton isn’t a substitute for suitable access, safe work procedures, PPE or regular breaks. If the device restricts movement, compromises equipment use or causes discomfort, stop the trial and reconsider the fit or task conditions.
Not sure which exoskeleton fits your task? Let the Ryggo advisor match it independently.
Ryggo
Ryggo helps industrial teams turn task observations into a practical exoskeleton decision. Its vendor-independent device comparison can help identify options for overhead inspection work, including tool use, PPE compatibility and potential operational return. A workplace video produces an automated RULA-based screening estimate; this does not replace professional ergonomic consultancy. The Deploy & Decide trial lets teams test shortlisted devices in their own workplace before buying, so decisions reflect practical fit as well as specifications.
Consider this approach when several devices seem suitable but differences in support, comfort or potential value remain unclear. Ryggo’s vendor-independent comparison and ROI calculation bring those factors into one recommendation, while a workplace trial helps assess how the device performs in practice. To discuss your overhead inspection requirements, contact Ryggo.
Turn the shortlist into a workplace decision
Set a clear decision threshold before committing to a purchase: which inspection movements must remain unrestricted, what worker feedback would justify continuing, and which operational measure would make the investment worthwhile? This gives the team a consistent basis for assessing an exoskeleton for overhead inspection tasks, rather than relying on impressions from one wearer or shift.
Ryggo can support the next stage with vendor-independent device comparisons and ROI calculations. Its Deploy & Decide programme lets teams trial shortlisted options in the work setting before buying. The matching process includes an automated RULA-based screening estimate, which does not replace professional ergonomic consultancy. Involve HSE, operations, procurement and technicians, and agree on criteria and evidence to record for the final review. Make the reasons for proceeding, adapting or stopping explicit.
If you’re ready to shape that assessment around your inspection work, contact Ryggo to discuss exoskeletons. A measured, worker-informed decision is a practical step towards supporting ergonomics while keeping the operational case clear.
Frequently Asked Questions
What types of exoskeletons support overhead inspection work?
Shoulder or upper-body exoskeletons are the main types to consider for sustained raised-arm inspections. Passive designs provide mechanical support without powered assistance, while active designs use powered assistance. The relevant distinction is how each device supports the movements in your task, not simply its technology label. For example, an inspection involving frequent arm elevation may call for different support from one involving brief reaches and regular tool changes.
Which passive shoulder exoskeletons are best for overhead tasks?
No passive shoulder exoskeleton is best for every overhead task or wearer. Compare the support it provides, its adjustments and how it feels during the specific inspection, including repeated reaches and tool handling. A suitable shortlist should reflect the worker’s movements and work environment. Then assess candidate devices with the intended users, because comfort and freedom of movement can differ between people performing the same task.
How much do industrial exoskeletons for overhead work cost?
Costs vary by device type, support mechanism and purchase arrangement, so no single price applies to every exoskeleton for overhead work. Compare the total investment for the options under consideration, including implementation requirements, and assess it against expected use. Base potential benefits on measured workplace results rather than assumed injury savings or productivity gains. A trial can provide relevant evidence before a purchase decision.
How much do overhead exoskeletons reduce shoulder muscle strain and fatigue?
There’s no single reduction that applies reliably to every worker and inspection task. Effects depend on the device, fit, movement and duration of use. During a workplace trial, compare the same inspection actions and record worker feedback and any change in task performance. Treat the outcome as specific to the tested setup, not as a guaranteed result for other workers or jobs.
Are exoskeletons suitable for overhead inspection tasks with tools or ladders?
Exoskeletons may suit inspections involving tools, but assess the complete setup before use. For example, check whether a worker can hold and reposition a torch while maintaining clear access to the inspection point. Ladder work adds movement and balance considerations; don’t assume an exoskeleton is suitable on a ladder. Evaluate the task’s safety procedures, PPE and equipment together, and rule out any configuration that restricts movement or tool control.
Find the right device before you trial anything
The Ryggo advisor maps your task, environment, and requirements to compatible devices — independently, across the full European market.