Key takeaways
- Plan a pilot of at least 2 weeks so users have time to adapt and you can assess the device in routine work.
- Compare the same tasks with and without the exoskeleton, using consistent measures such as fatigue, pain, acceptance and productivity.
- Assess fit and alignment during real tasks, not just during initial setup; discomfort or restricted movement can affect acceptance.
- Involve end users early and gather feedback during the pilot, including after the first few days of use.
- Include safety risks and relevant standards in the assessment, and treat any ergonomic benefit as something to evaluate in the workplace trial.
Table of Contents
- Falls and other maintenance-related safety risks
- Baseline comparisons with and without an exoskeleton
- Device fit and alignment
- Workplace exoskeleton user acceptance and field testing
- What standards and regulations should European buyers consider when testing exoskeletons?
- Ryggo
Falls and other maintenance-related safety risks
A fall during an exoskeleton trial can reveal problems with movement, fit or task compatibility. Treat every slip, trip, near miss and loss of balance as evidence, not as a minor adjustment issue. Record the task, floor conditions, load handling, device model and what the worker was doing immediately beforehand. This helps distinguish a device-related issue from a wider workplace hazard.
Powered models can alter how workers move, while passive models can affect posture and clearance. Observe transitions such as stepping backwards, turning in a narrow aisle, climbing a step or reaching around equipment. A worker carrying a box may have less freedom to recover balance. Include the actual route, work surface and handling sequence in the trial, rather than relying on a clear demonstration area.

Before each use, follow the manufacturer’s inspection and setup instructions. Check for visible wear or damage, loose or displaced straps, obstructed joints, exposed wiring, and battery or connection warnings where relevant to the model. Stop using the device if you notice a defect, unusual sound or unexpected movement. Record the issue and keep the device out of service until you have followed the manufacturer’s instructions.
Use a consistent reporting routine for workers and supervisors:
- Record the task, location, shift conditions and device model.
- Describe the event, including a near miss or movement restriction.
- Note discomfort, pressure points or a change in balance.
- Document whether use stopped and what action followed.
A clear log makes patterns visible. For example, repeated reports of restricted turning near a workbench may point to a task mismatch, not simply unfamiliarity. A sudden change in assistance or an unstable sensation needs prompt attention. Don’t ask workers to continue a task just to complete the trial record.
Maintenance-related risks include using a device in an unintended condition or overlooking damage between users. Assign someone to manage pre-use checks, cleaning and issue reporting, following the manufacturer’s directions. Keep damaged or suspect equipment separate from ready-to-use models. If different workers share a device, record who used it and whether straps or settings were adjusted between shifts.
Review safety feedback alongside acceptance and task performance. Increased output is not a success if workers report pain, reduced control or repeated near misses. Compare observations across tasks and users, then decide whether to adjust the task, provide manufacturer-led onboarding, pause use or end the trial. This keeps safety risks visible while the team assesses whether the exoskeleton supports work, with the team monitoring for any added strain or safety concerns.
Baseline comparisons with and without an exoskeleton
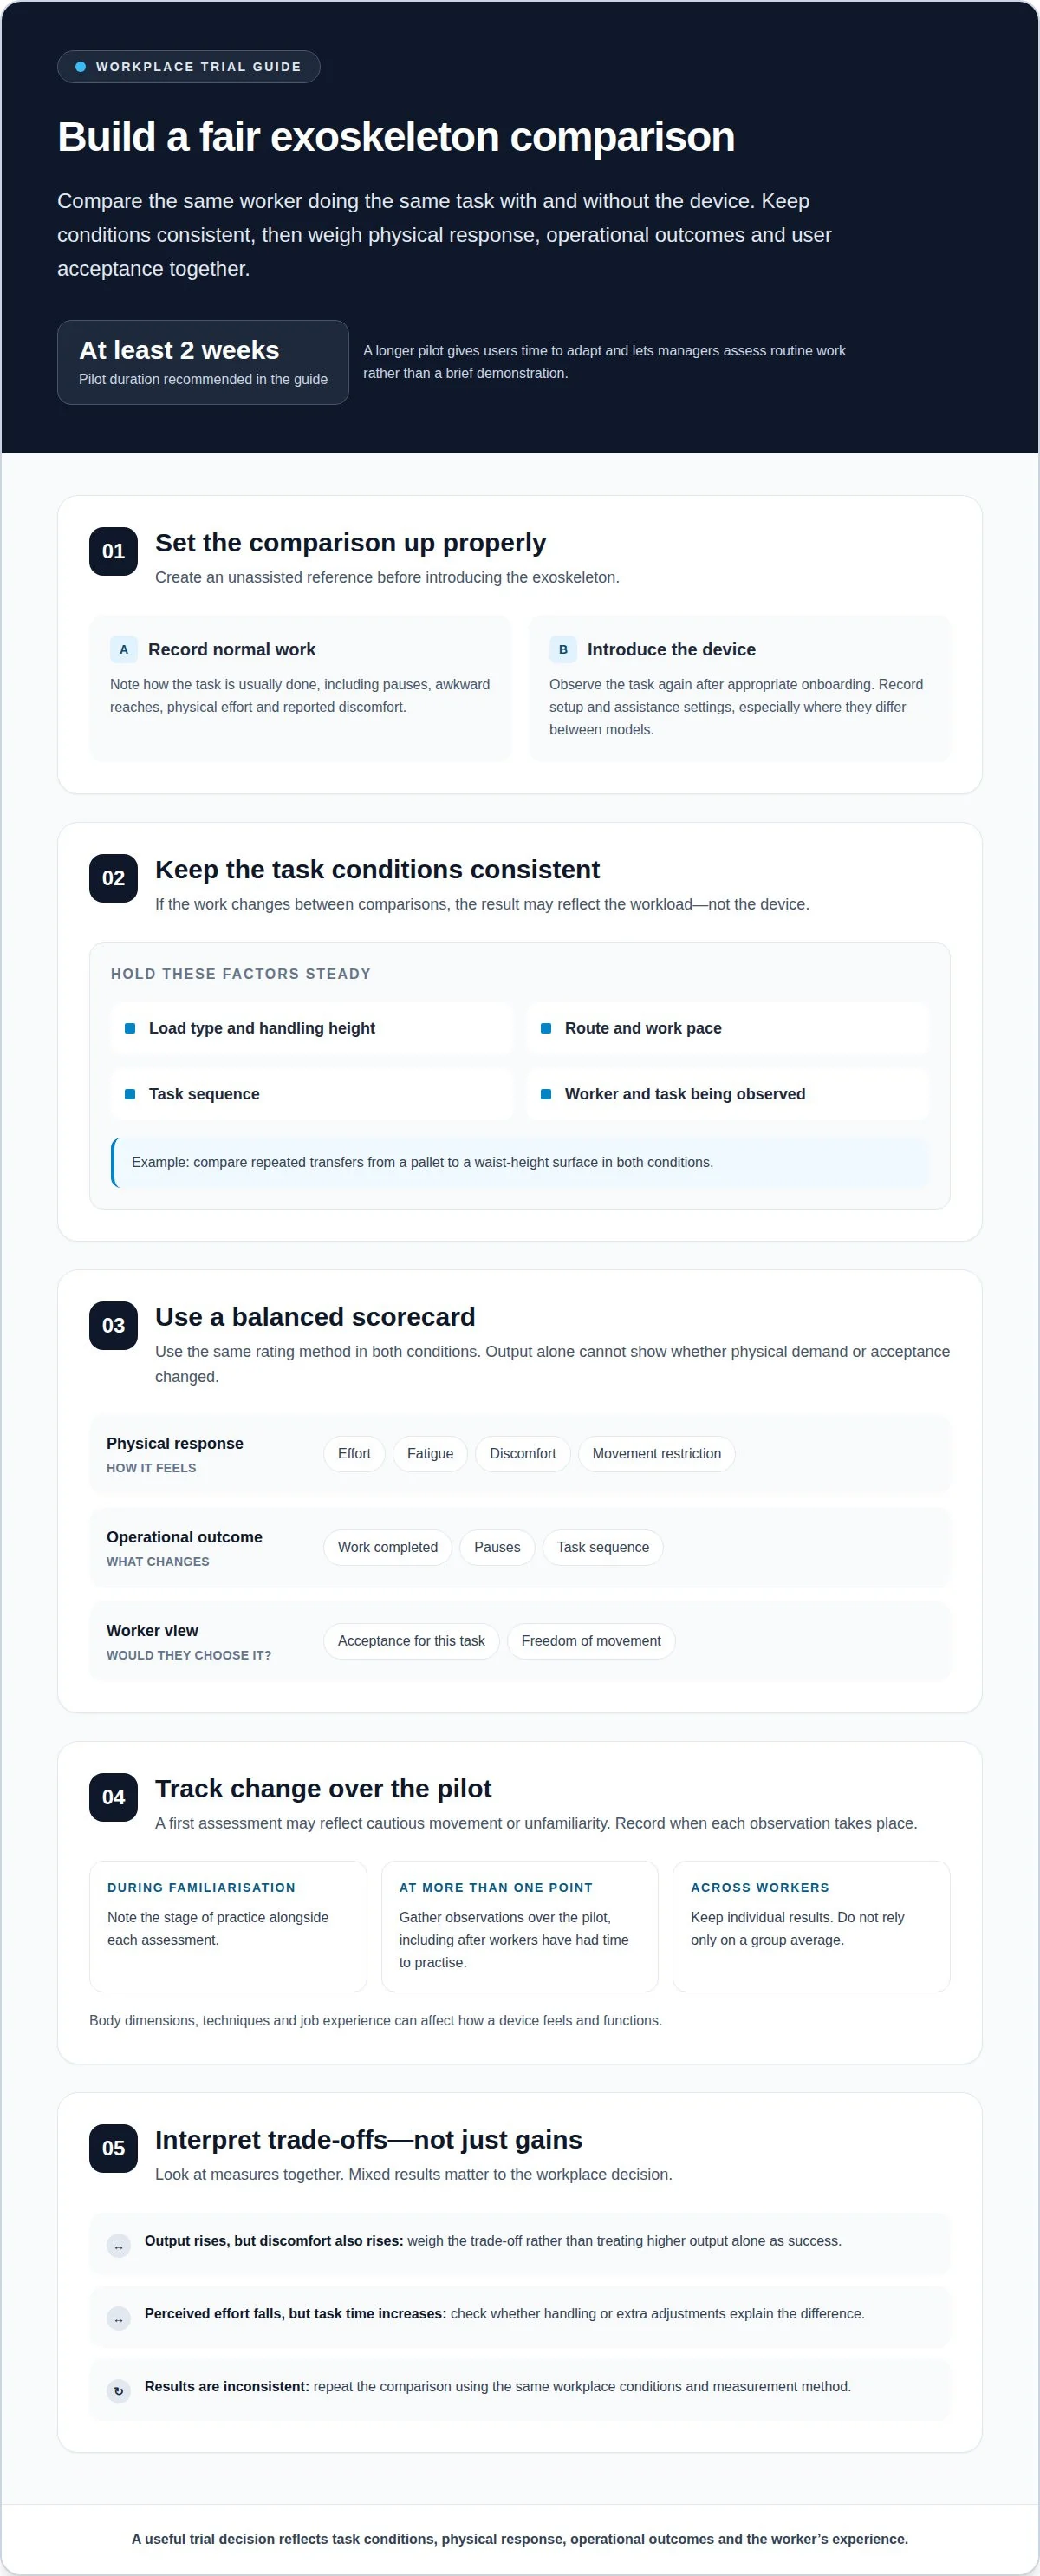
A fair assessment compares the same worker doing the same task with and without the exoskeleton. Keep the load, work height, route, pace and task sequence consistent. For example, compare repeated transfers from a pallet to a waist-height surface in both conditions. If the task changes, the result may reflect the workload rather than the device.
Start with an unassisted baseline before introducing the model. Record how the task is normally done, including pauses, awkward reaches, physical effort and any reported discomfort. Then observe the task again while the worker wears the device, after appropriate onboarding. A powered model may require a different familiarisation process from a lightweight passive design, so note the setup and assistance settings.
Choose measures that connect to the workplace decision. Output alone cannot show whether an exoskeleton supports ergonomics or changes physical demand. Track task completion, fatigue, discomfort, perceived effort, movement freedom and worker acceptance. Use the same rating method in both conditions.
- Task conditions: note the load type, handling height, route and work pace.
- Physical response: record effort, fatigue, discomfort and movement restriction.
- Operational outcome: compare completed work, pauses and any change in task sequence.
- User view: capture whether the worker would choose to wear the device for that task.
Take observations at more than one point. A worker may initially move cautiously, then perform differently after practice, so record the stage of familiarisation with each assessment. If several workers take part, preserve individual results rather than relying only on a group average. Body dimensions, techniques and job experience can all affect how a device feels and functions.
Interpret differences carefully. If output rises while discomfort increases or freedom of movement worsens, the trade-off matters. If perceived effort falls but task time increases, identify whether the device changes handling or requires extra adjustments. Repeat the comparison when results seem inconsistent, using the same workplace conditions and measurement method. This gives operations and HSE teams a clearer basis for deciding whether the exoskeleton supports the task, needs adjustment or is unsuitable for the work.
Device fit and alignment
A wearable device must fit the worker and the task, not just the body shape observed during setup. Check alignment as the worker performs the intended movement. For overhead work, observe whether the shoulder elements stay in position during reaching and lowering. For pallet handling, look for shifting straps, pressure points or restricted bending. Poor fit can affect comfort and movement, and ultimately whether workers accept the device.
Start with the manufacturer’s fitting instructions, then assess the device while the worker stands, walks and performs the target task. Check that contact points sit where intended and straps stay secure without pinching. Ask the worker to describe pressure, rubbing or instability as it occurs. A device that feels acceptable while standing may shift during repeated lifting or twisting.
Use a repeatable fit check for each worker and model. Record adjustments so later sessions can distinguish fit changes from task changes.
- Starting position: record strap settings and where the device contacts the body.
- Movement: observe walking, bending, reaching and turning during normal handling.
- Comfort: ask about pressure, heat, rubbing or restricted movement.
- After the task: note whether the device shifted or left discomfort.
Alignment matters because assistance must correspond to the movement it is intended to support. If a shoulder support shifts out of position during overhead work, pause and refit it according to the instructions. Then repeat the same movement. If discomfort or displacement continues, record the task and fit issue rather than asking the worker to compensate with a different posture.
Clothing and other wearable equipment can also affect fit. Assess the exoskeleton with the workwear and protective equipment used at the workplace. For example, a belt, harness or heavy jacket may interfere with a contact point or strap. Include realistic handling, such as carrying a box through a narrow aisle, because it can reveal restrictions missed during a static fitting.
Fit is individual. Two workers doing the same task may need different adjustments, and one model may not suit both. Keep records by worker, model and task, including changes made between sessions. Use these observations to distinguish a correctable setup issue from a mismatch between the device and the job. A consistent fit process makes comfort and alignment part of the trial decision, rather than an informal impression.
Ready to find the right device for your operation?
Workplace exoskeleton user acceptance and field testing
Field testing shows whether assistance suits real tasks, users and work patterns. A sound decision considers safety, acceptance, fatigue and effort, not device performance alone.
Consent, training, and accessibility
Informed consent means workers understand the trial’s purpose, what information will be recorded, and how to raise concerns or stop participating. Explain the task, device, expected assistance and feedback process before testing begins. Provide manufacturer-led onboarding so users can adjust and operate the model correctly.
Accessibility means involving workers who perform the target job and considering differences in reach, mobility, workwear and task position. Workers should be able to report discomfort without pressure to continue. This improves feedback and helps establish whether the device supports the intended work.
Testing costs and timelines
There is no single typical testing cost: the device, trial duration, transport, training and evaluation requirements affect the total. Define these elements before setting a budget, and compare the cost with the operational question the trial needs to answer.
Allow at least 2 weeks for a workplace pilot. The first week is an adaptation period, so early effort or acceptance feedback should not stand alone. Collect worker feedback after 2-3 days, then continue observing routine tasks to see whether acceptance and fatigue change with experience.
Participant and session planning
Choose participants who represent the task, shifts and working conditions being assessed. Involve end users from the start, and include workers with different experience or body dimensions where relevant. There is no universal participant count; representing the real job matters more than choosing an arbitrary group size.
Repeat comparable sessions with and without the device, keeping the task and conditions consistent. Record assistance, effort, fatigue, comfort and acceptance after each session. Compare individual results as well as shared patterns, since an average can hide a poor fit for one role.
Set acceptance criteria before testing, such as acceptable movement, task completion and user willingness to continue. Document the criteria, session conditions, device settings, observations and worker comments in one record. Note any change in task or setup so the team can interpret results accurately and decide whether to adapt, extend or end the pilot.
What standards and regulations should European buyers consider when testing exoskeletons?
For European buyers, a workplace trial is not automatically a test of regulatory compliance. Separate practical questions, such as task fit and worker acceptance, from requirements that may apply to a product’s design, quality system or intended medical use. Confirm which requirements apply to the specific model and intended use before defining the scope of testing.
According to the International Organization for Standardization, ISO 13482:2014 covers safety requirements for personal care robots, including exoskeletons classified as physical assistant robots. Its relevance therefore depends on how a particular system is classified. It is not a blanket standard for every wearable device used in a factory, warehouse or other workplace.
For a European workplace assessment, keep the records distinct:
- Product scope: identify the model, intended use and relevant product category.
- Workplace evaluation: document tasks, user feedback, fit, movement and observed safety concerns.
- Regulatory references: record the standards or rules considered and why they apply to that model and market.
- Decision: state whether the evidence supports continued testing, changes to the test or stopping use.
This distinction prevents a successful task trial from being mistaken for proof of regulatory compliance. It also avoids the opposite error: treating a product classification as evidence that workers will accept the device or that it suits their handling needs. For example, an exoskeleton may meet a relevant product requirement yet still restrict turning beside a conveyor. Record regulatory scope separately from field observations, and keep each conclusion within the evidence collected. This makes the decision clearer for HSE, procurement and operations teams assessing workplace use.
Not sure which exoskeleton fits your task? Let the Ryggo advisor match it independently.
Ryggo
Ryggo can help turn field observations into a clearer device decision. Its vendor-neutral comparisons connect the task, worker feedback and operational priorities with suitable exoskeleton options. Use this support when your team has defined the work to assess but needs help narrowing the options or weighing ergonomic fit against operational value.
For a practical evaluation before purchase, Ryggo’s Deploy & Decide trial programme lets companies assess devices in their own working context. Its transparent comparison and ROI calculation can inform whether to proceed, adapt the trial or choose a different option.
To discuss your testing needs and next steps, contact Ryggo.
Make the pilot a decision point
Treat the pilot as a decision gate, not a demonstration. Before any wider rollout, assign responsibility for reviewing worker feedback, task changes and emerging concerns. This makes acceptance part of operational practice rather than a box ticked at purchase. It also gives HSE and operations teams a clear process for acting on what users report.
Use this exoskeleton user acceptance testing guide to document the decision. State whether the evidence supports proceeding, refining the use case or stopping. Share the decision with workers and explain what happens next, including how feedback will inform future use. Clear communication helps maintain trust, especially when the decision is to pause or change direction.
A measured next step is more valuable than a rushed rollout. If you’re ready to discuss how to take your trial forward, contact Ryggo. Make the decision that best fits the work and the people doing it.
Frequently asked questions
How long should the pilot period last?
Choose a period long enough to capture ordinary work variation, including different shifts or task rotations. If the operation changes substantially over the working week, align the trial schedule with those cycles so the decision reflects more than one routine or team.
How many exoskeletons are needed for a pilot?
Compare suitable device options to give the team a basis for judging relative suitability. Keep comparison conditions consistent, and record which device each participant used so feedback remains attributable to the right option.
What is user acceptance testing for exoskeletons?
It is a workplace evaluation of whether users accept an exoskeleton as part of their actual job. Unlike a bench check, it captures how people respond to wearing and operating the device during normal work, including whether they choose to keep using it after initial exposure.
How do you create an exoskeleton user acceptance test plan?
Use an exoskeleton user acceptance testing guide to document the decision, participants, test tasks, feedback route and criteria in one place. Assign an owner to each record and set a review point for unresolved issues. This keeps operational observations connected to the final purchasing decision.
What usability, comfort, and fit criteria should exoskeleton testing measure?
Assess whether workers can put on, adjust and remove the device independently, and whether its controls or fastenings are easy to understand. Record whether it interferes with routine communication, tool access or required protective clothing. These practical usability details can reveal barriers beyond discomfort.
How should exoskeleton safety and risk be evaluated during user testing?
Set a clear escalation route before testing begins. Workers should know whom to tell about a defect, discomfort or unexpected behaviour, and who can pause the activity. Keep incident records separate from routine preference feedback so urgent concerns receive prompt attention and follow-up.
What tasks and real-world conditions should exoskeleton acceptance tests include?
Assess transitions around the task, not only its central movement. For example, observe entering and leaving a work area, retrieving tools, changing workstations and interacting with colleagues. These moments can reveal practical restrictions that a short, isolated task demonstration may miss.
How do you measure exoskeleton performance, fatigue, and productivity?
Choose indicators that match the operational objective, such as completed units, task quality or interruptions. Compare them with worker-reported fatigue and effort, then interpret the measures together. A single productivity figure cannot show whether a change reflects the device, workload variation or a different work method.
Find the right device before you trial anything
The Ryggo advisor maps your task, environment, and requirements to compatible devices — independently, across the full European market.