Key takeaways
- Use available measurements to narrow the options, then treat a real fit check as essential when dimensions approach a size-chart limit.
- When measurements are missing, assess the device’s adjustment range and don’t assign it to a worker whose dimensions fall outside that range.
- Adjust the waist belt and leg cuffs for stable contact without restricting movement, and reassess the fit during work tasks.
- Use BMI only as background information; it cannot show whether an exoskeleton fits an individual body shape.
- Assess comfort and movement in the worker’s actual PPE and work clothing, not just in a static fitting.
Table of contents
- What if my body measurements are at the limit of the size chart?
- Recommendations when measurements are missing
- Adjusting the waist belt and leg cuffs
- BMI ranges and possible fit concerns
- Why exoskeleton fit matters for comfort and movement
- Ryggo
What if my body measurements are at the limit of the size chart?
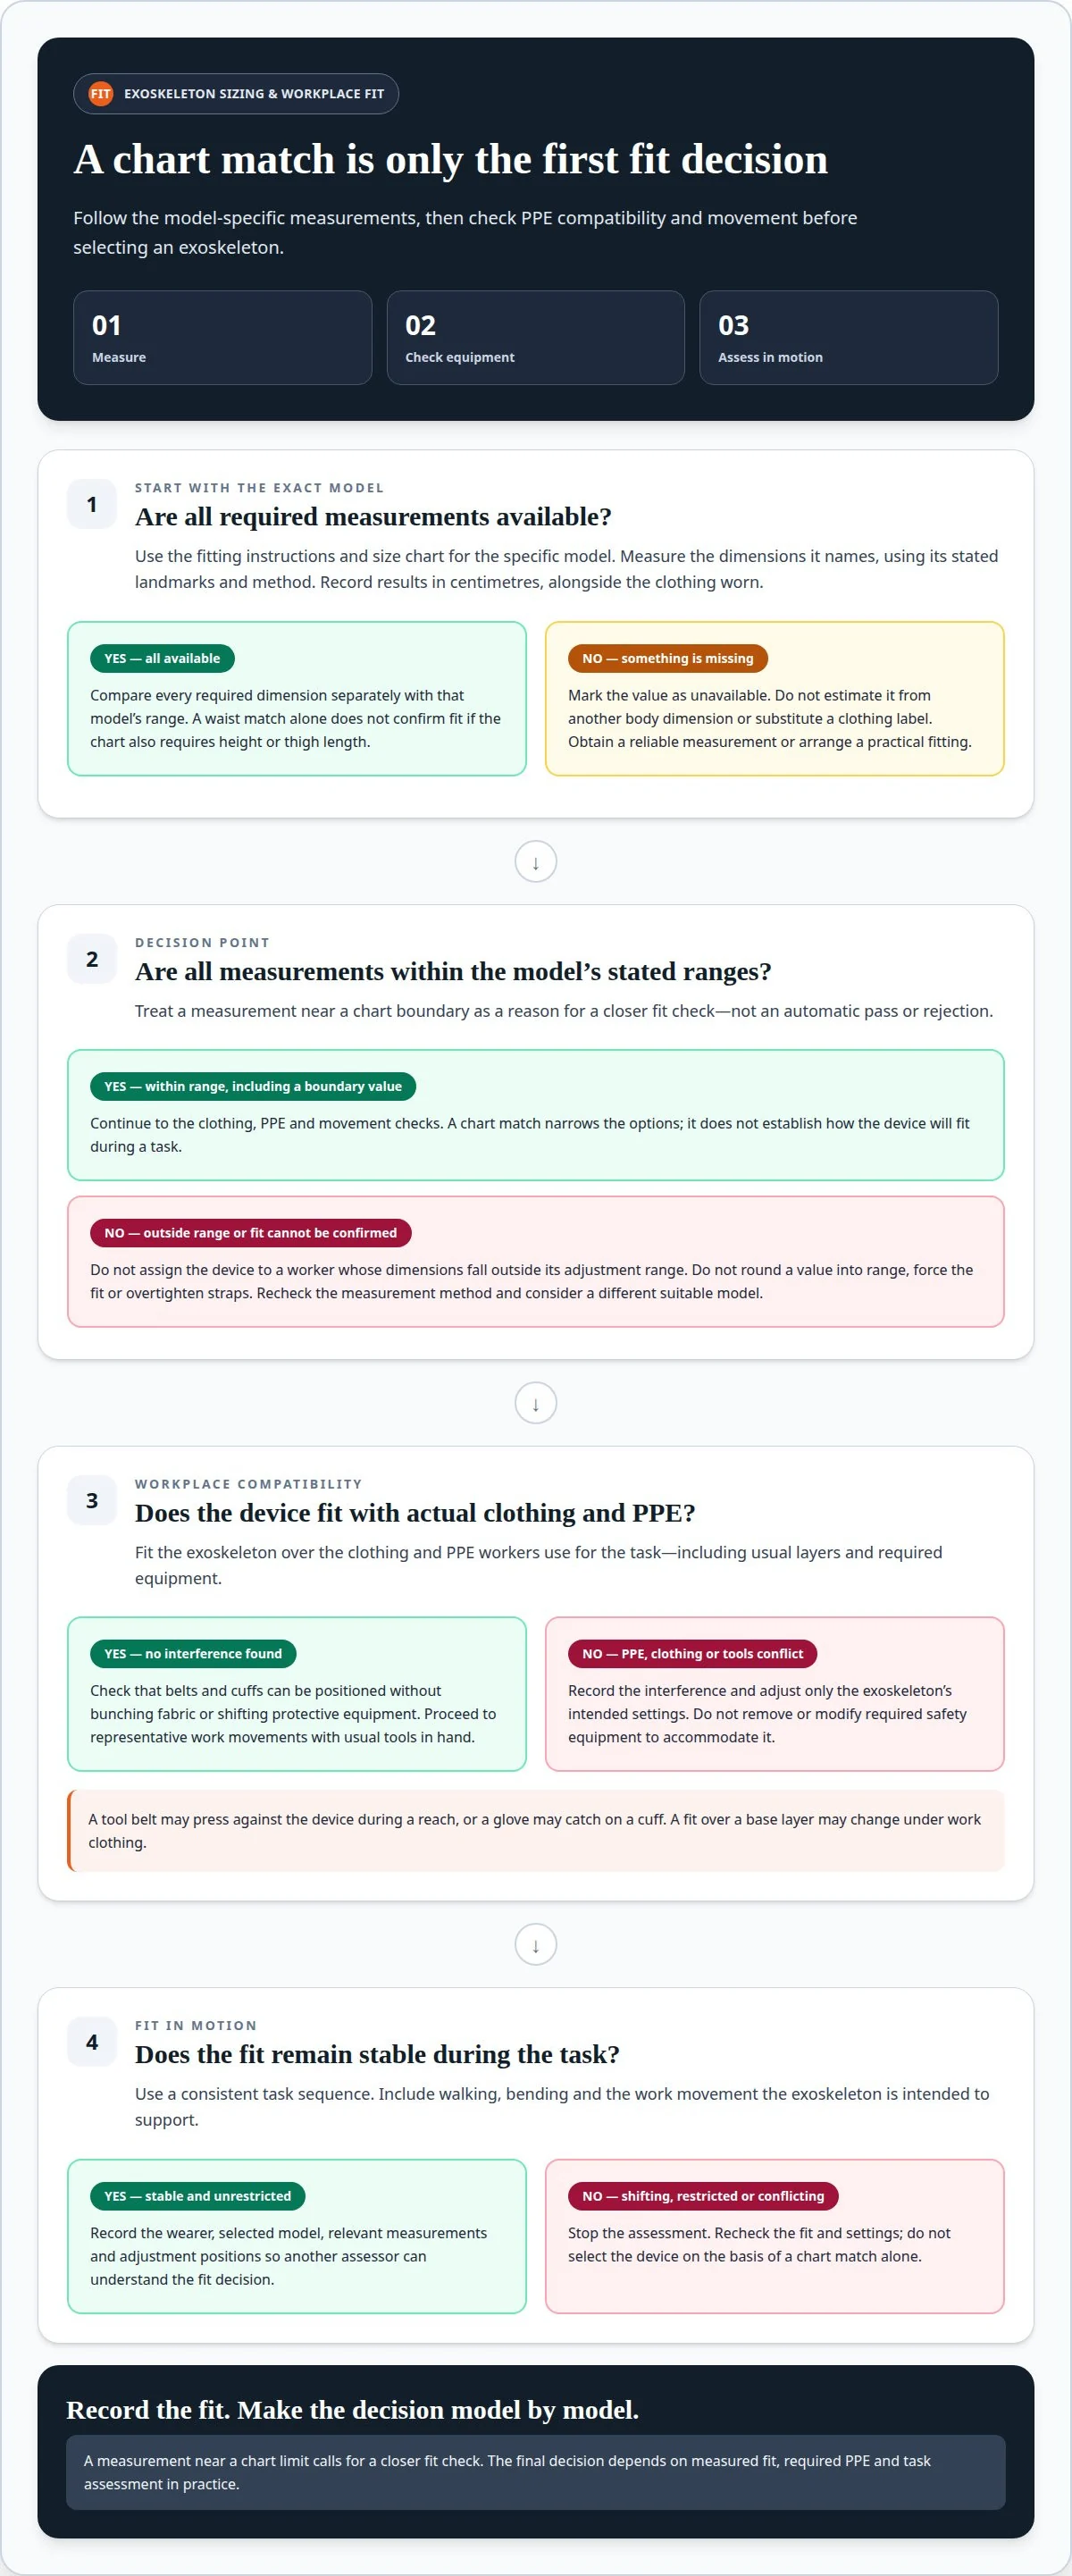
A measurement near a chart boundary calls for a closer fit check, not an automatic pass or rejection. Use this exoskeleton fit and sizing guide to compare body dimensions, clothing, equipment and movement before selecting a model.
Compare measurements with the size chart
Measure the body dimensions named in the manufacturer’s chart, using its stated landmarks and method. Compare each result with the range for the specific size. Don’t round a measurement into range or assume one matching dimension confirms fit. If a waist measurement is near a boundary, check every other required dimension before choosing a size.
Check PPE, clothing, and tool compatibility
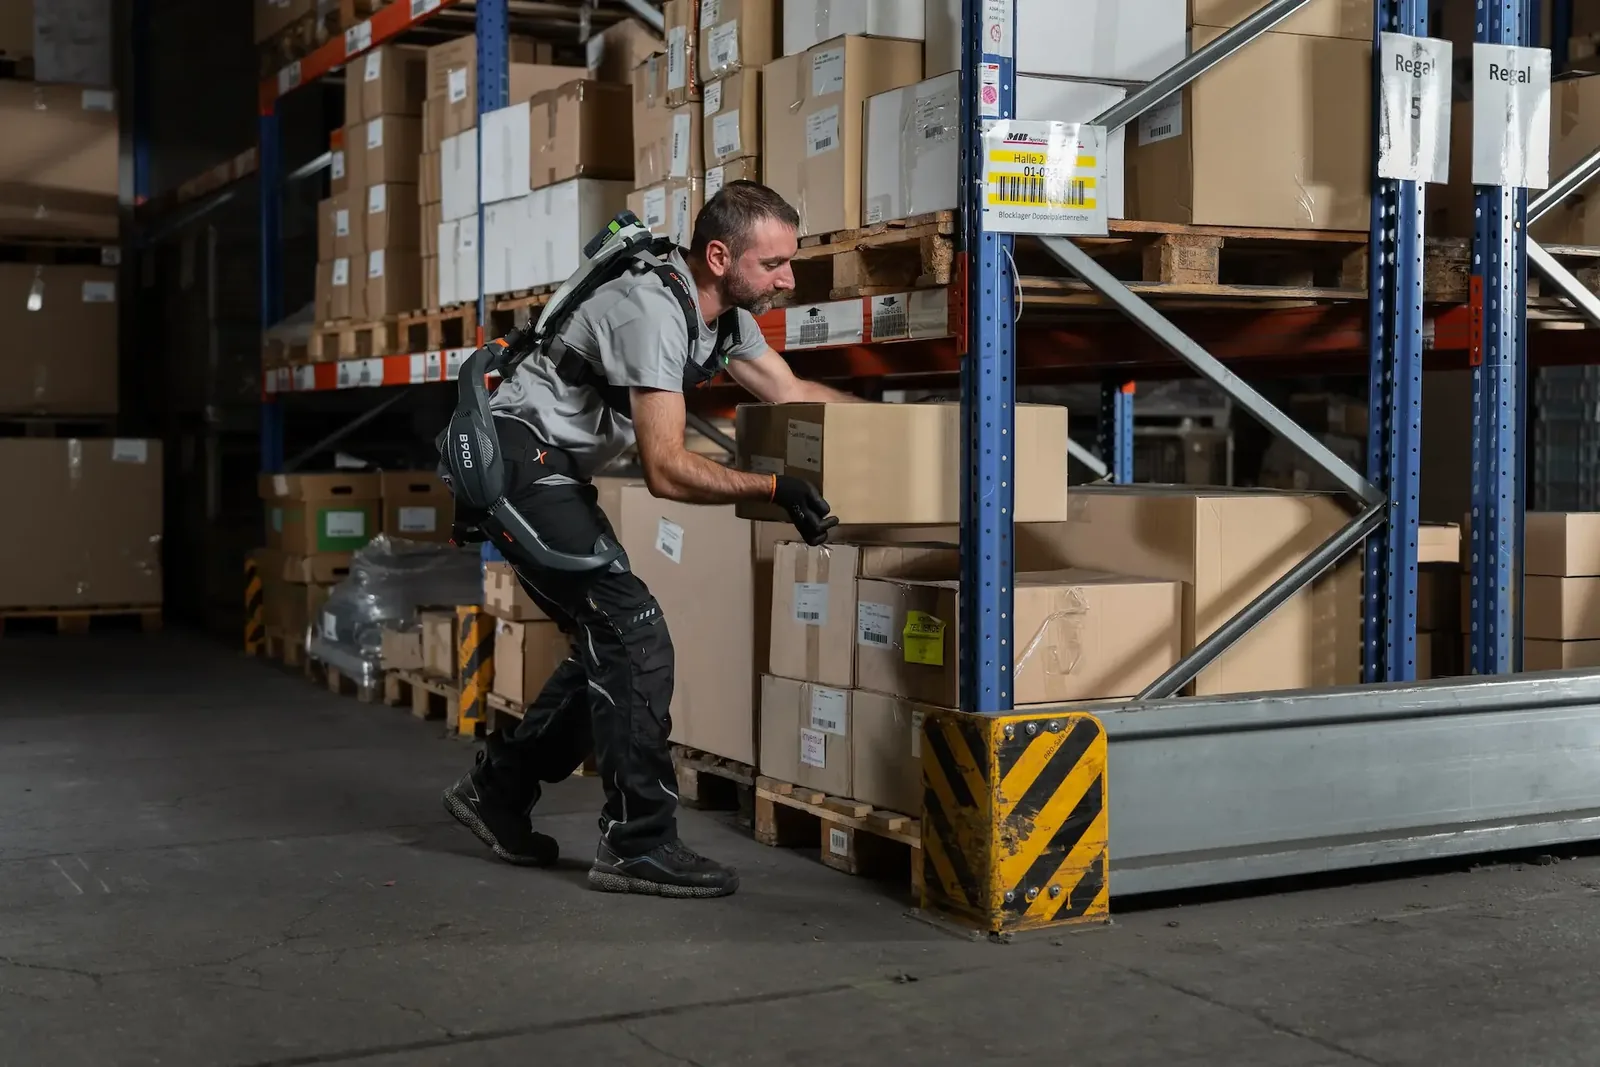
Fit the exoskeleton over the clothing and PPE workers actually wear for the task. Include usual layers, such as a work jacket, and required equipment such as a harness or protective gloves. Check that belts and cuffs can be positioned without bunching fabric or shifting protective equipment. Don’t remove or modify required safety equipment to accommodate an exoskeleton.
Then perform representative tasks with the usual tools in hand. Check, for example, whether a tool belt presses against the exoskeleton during a reach or a glove catches on a cuff. A fit that works over a base layer may change under work clothing. Record each interference and adjust only the exoskeleton’s intended settings.
Record the fit and assess movement. Record the wearer, selected model, relevant measurements and adjustment positions so another assessor can understand the decision.
Use a consistent task sequence to assess the boundary fit in practice. Include walking, bending and the work movement the exoskeleton is intended to support. Stop the assessment if the device shifts, restricts the task or conflicts with PPE. A chart match is a starting point, not the complete fit decision. Use this exoskeleton fit and sizing guide as a structured check, then base selection on the measured fit and task assessment.
Recommendations when measurements are missing
Use available measurements to narrow the options, but don’t treat a partial match as proof of fit. Industrial models need task and PPE checks; medical and consumer models also need assessment against their intended wearer and activity.
In Europe, arrange a model-specific fitting or workplace trial through the manufacturer or supplier. An occupational ergonomics professional can help assess how the device fits the task and wearer.
Take body measurements for fit
Measure the dimensions named in the exact model’s fitting instructions, using its stated landmarks and posture. Record each result in centimetres, alongside the date and clothing worn. A waist measurement alone, for example, cannot establish fit if the size chart also requires height or thigh length.
Use a consistent measurement method across workers. Don’t substitute a clothing label or estimate a missing value from another body dimension. If a measurement can’t be obtained reliably, mark it as unavailable. That record helps show whether the next step is another measurement or a practical fitting.
Compare height, waist, and thigh ranges
Compare height, waist and thigh measurements separately with the ranges for the specific model. Don’t infer that a match on height means the waist or thigh adjustment will also fit.
Keep each range beside its corresponding measurement, and do not infer a missing adjustment range from another model’s chart.
Assess borderline measurements
Repeat any measurement close to a chart limit, checking tape position, posture and clothing. Record both readings if they differ, then resolve the method before choosing a size. Don’t round a borderline value into the stated range or change the measurement landmarks to obtain a match.
Next, assess the candidate device during representative work movements, such as reaching, bending and walking. Check whether its supports stay positioned and adjustments remain within their intended range. Don’t require a worker to use an exoskeleton if their body dimensions fall outside that range. Never force a fit by overtightening straps.
Find fitting or try-on options
Arrange a fitting with the manufacturer or supplier that reflects the intended task, work clothing and required PPE. For a European workplace, an occupational ergonomics professional can help assess task compatibility during the fitting. Check that the wearer can adjust the device and move through the relevant work activity.
Industrial, medical and consumer exoskeletons require checks suited to their intended use. For industry, assess work tasks, tools and PPE; for medical use, consider the care activity and wearer or patient; for consumer use, assess the intended personal activity. In every case, follow the model’s fitting instructions and adjustment range.
Adjusting the waist belt and leg cuffs
Position each support point according to the device’s fitting instructions, then adjust the waist belt and leg cuffs without forcing their range. At the shoulders, waist, hips and legs, the exoskeleton should sit securely while allowing the wearer’s intended movements.
A belt that pinches, or a cuff that shifts or rubs, can signal excessive tightness, looseness or misalignment. Persistent pain, numbness or skin reactions need assessment by a qualified occupational health professional.
Start with the manufacturer’s fitting sequence. Put the exoskeleton on as instructed, then identify its intended contact points. Adjust in the order specified for that model, rather than tightening every strap at once. Keep the wearer’s usual work clothing in place. If a jacket folds beneath the waist belt, smooth it before changing the adjustment.
Position the waist belt securely. Follow the device instructions for belt height and orientation, then fasten it so it stays in place during movement. Check that it doesn’t dig into the waist, compress clothing into a hard fold or slide when the wearer bends. A belt that needs constant repositioning may indicate poor placement or an unsuitable fit.
Set each leg cuff at its intended contact point. Use the manufacturer’s instructions to position cuffs on the thighs or legs. Fasten them securely without pulling them tight enough to create pressure or restrict movement. Check for fabric trapped beneath a cuff and confirm the device’s supports remain aligned as the wearer stands, walks and bends.
Test the fit through representative movements. Ask the wearer to perform the task the exoskeleton is intended to support, such as reaching or bending. Observe whether the belt or cuffs move, rub or pull the exoskeleton out of alignment. Adjust one setting at a time, then repeat the same movement. This makes it easier to identify which change improved or worsened the fit.
Record the final settings and wearer feedback. Note the model, belt and cuff positions, clothing worn and any adjustments made. Ask the wearer to describe pressure, rubbing or restricted movement instead of relying only on visual checks. If a support point shifts during the task, pause and reassess its placement. Don’t compensate for misalignment by overtightening another strap.
Ready to find the right device for your operation?
BMI ranges and possible fit concerns
Use BMI as background information, not as an exoskeleton size selector. A BMI value cannot replace the model’s adjustment ranges or an assessment of how its supports fit.
Calculate BMI only as a reference. BMI relates a person’s weight to their height, but it doesn’t describe body proportions or show where a device’s supports will sit. A worker’s BMI may fall within a familiar range while their waist, hips or thighs still don’t match a particular exoskeleton’s adjustment range.
Compare body dimensions with the specific model. Check the manufacturer’s fitting information for the dimensions it uses, such as height, waist or thigh measurements. Record each result beside its relevant range. Don’t use BMI to fill a gap in the chart or infer that people with similar BMI values need the same size.
For a workforce assessment, keep each worker’s measurements linked to the specific model being considered. Differences in torso or leg proportions can affect contact points even when overall height and BMI appear similar. The deciding evidence is whether the device fits within its intended adjustments.
Inspect straps and contact points during fitting. Fasten each strap according to the device instructions, then check that it stays positioned without pinching or slipping. Observe the waist, hips and legs while the wearer stands and moves. BMI cannot identify a strap that presses on one worker’s body shape or shifts during a task.
Adjust only the settings intended for the device. Don’t tighten a strap beyond its normal range to accommodate a body dimension outside the stated limits. If the exoskeleton remains unstable or restrictive, reassess the model’s fit instead of treating BMI as the explanation.
Assess comfort during representative tasks. Ask the wearer to perform the movements the device is intended to support, such as bending, reaching or walking. Check for restricted movement, rubbing, pressure or changes in alignment. Record which task caused the issue and where it occurred; a static fitting alone may not reveal it.
If discomfort persists, stop the fitting and review the device’s positioning and suitability. Persistent pain, numbness or skin reactions should be evaluated by a qualified occupational health professional. A BMI figure cannot determine the cause or resolve those symptoms.
Make the decision from fit, not a BMI category. Consider the model’s measurement ranges, adjustment limits and task assessment together. BMI can help describe the wearer, but it cannot confirm that an exoskeleton fits or supports comfortable movement. Keep the fitting observations with the worker’s model-specific assessment.
Why exoskeleton fit matters for comfort and movement
Fit affects where an exoskeleton transfers support and whether workers can perform their tasks naturally. Assess comfort and movement together, using the actual work task rather than relying on a static fitting alone.
Match support points to the wearer’s movement. Check where the exoskeleton contacts the shoulders, waist, hips and legs. Each support point should stay positioned as the wearer reaches, bends and walks. A device that shifts during a lift may change how it feels and functions. Observe the movement and identify which contact point moved before adjusting the device.
Use the same task sequence for each wearer. For example, assess a forward reach, a bend and a return to standing. Record whether the frame, belt or cuffs shift during each movement. This helps distinguish a fit issue from a task-specific restriction without assuming all workers need identical settings.
Assess comfort through the full task cycle. Ask the wearer to perform the work movement at a natural pace, then report pressure, rubbing or restriction. A strap may feel acceptable while standing but press against the body during a bend. Check the same area again after the movement, especially where the device contacts clothing or skin.
Don’t judge comfort from one brief pose. Include the movements that define the task, such as reaching to a shelf or handling a tool. If discomfort appears, pause and identify its location and trigger. Adjust the relevant setting according to the manufacturer’s instructions, then repeat the movement to assess the change.
Check body measurements against real contact points. Circumference and length measurements can help identify adjustment needs, but they don’t capture every difference in body shape. Two workers with the same waist circumference may experience different pressure around the hips or thighs. Confirm that the device’s contact points align with each wearer instead of relying on one measurement.
Keep clothing consistent during the assessment. A tucked-in shirt, work jacket or tool belt can change how the waist support sits. For example, a belt resting over a fabric fold may shift when the worker bends. Record the clothing and equipment used so a later fitting can reproduce the same conditions.
Use movement checks to guide adjustments. Change one fitting setting at a time, then repeat the same task movement. If a cuff slips during a bend, check its position and fastening before changing the waist belt. Changing several adjustments together makes it harder to identify what caused an improvement or a new restriction.
Stop and reassess if the device continues to shift or restricts the task. Persistent pain, numbness or skin reactions require evaluation by a qualified occupational health professional. A structured exoskeleton task assessment can help connect the intended work movement with the device selection process.
Not sure which exoskeleton fits your task? Let the Ryggo advisor match it independently.
Ryggo
Ryggo helps organisations move from individual fit checks to a considered exoskeleton decision across a workforce. Its vendor-independent recommendations are based solely on fit across vendors, connecting job requirements and wearer needs with a suitable option. When measurements or task conditions leave questions, the Deploy & Decide trial lets a company assess selected devices in its own working context before purchase. The trial fee counts fully toward the purchase if the devices are kept.
This approach can help warehouse, factory and construction teams compare options without treating a size-chart match as the final decision. Bring task and fitting questions into the selection process.
Contact Ryggo about exoskeleton fit to discuss your assessment needs.
Turn fit findings into a workforce decision
Treat this exoskeleton fit and sizing guide as the start of a workforce decision, not a final sign-off. A fit that works for one wearer or task may not suit another. Before wider adoption, define how your organisation will judge practical suitability across roles, workstations and required equipment.
Set clear decision criteria with operations and HSE teams. Consider whether workers can use the device for its intended task, whether the fitting process is workable and how feedback will be captured during evaluation. A structured review helps separate individual adjustment needs from issues that could affect a wider deployment. It also gives procurement a practical basis for comparing options and deciding what merits further assessment.
Where you need support moving from fit questions to device selection, ask Ryggo about exoskeleton fit. A clear evaluation process can help your team make its next decision with confidence.
Frequently asked questions
What if I only have part of the measurements?
Use available measurements to narrow down possible models, but don’t treat a partial match as confirmed fit. Identify the dimensions required by the model’s chart and measure any missing ones using its stated method. If a measurement cannot be obtained, assess the wearer with the device during the intended task before making a selection. Don’t estimate a missing value from clothing size or another body dimension.
Will it fit me?
You can establish fit only against the adjustment range of a specific model and how it sits during your intended task. Compare the relevant measurements with that model’s chart, then wear the device as instructed and check its contact points during movement. Reaching or bending, for example, may reveal a shift that a standing check misses. If the device cannot be adjusted within its intended range, it isn’t a suitable fit.
How do you measure your body for an exoskeleton?
Follow the measurement instructions for the exact model, including its specified body landmarks and posture. Use a tape measure where required, record each result in centimetres and note the clothing worn. Common chart dimensions include height, waist circumference or thigh length, but models differ. Don’t substitute a nearby measurement or estimate from a garment label, as the chart may use different landmarks.
How do you adjust an exoskeleton for different body sizes and clothing?
Use only the model’s intended adjustment points, following its fitting sequence. Adjust the supports over the work clothing and PPE the wearer will actually use, then check whether belts, cuffs and contact points stay positioned during the task. A jacket fold beneath a waist support, for example, can affect placement. Don’t loosen or remove required PPE, or overtighten straps to compensate for dimensions outside the device’s adjustment range.
What exoskeleton size ranges and weight limits do manufacturers specify?
Manufacturers specify size ranges and weight limits by model, so there is no single range that applies to every exoskeleton. Use the current fitting information for the exact model and check every listed dimension and limit, not just height or body weight. If the manufacturer states an adjustment boundary, treat it as a limit rather than an invitation to force a fit through tighter straps.
What are the steps for putting on, adjusting, and checking an exoskeleton fit?
First, follow the model’s donning instructions and position its supports as shown. Next, fasten and adjust belts or cuffs without restricting movement. Then check alignment while standing and performing representative work movements, such as reaching or bending. Repeat the same movement after each adjustment, changing one setting at a time. Record the final settings and any pressure or interference for consistent reassessment.
What fit-related risks include pressure points, restricted movement, and skin irritation?
A poor fit can cause pressure, rubbing, shifting contact points or restricted movement during a task. Check beneath straps and around supports, and note when issues occur, such as during bending or reaching. Stop and reassess the fit if discomfort develops. Persistent pain, numbness or skin reactions should be evaluated by a qualified occupational health professional, not managed by further tightening.
Find the right device before you trial anything
The Ryggo advisor maps your task, environment, and requirements to compatible devices — independently, across the full European market.